Posted: July 15, 2016
“Leisure Furl” is an in-boom mainsail furling system by ForeSpar which we have on our Taswell 58, S/V Celebrate. Leisure Furl worked well for us around the world and my wife can reef/unreef our monster (600+ sq.ft.) mainsail by herself on a night watch. If your boat has a large, full-batten main and you sail short-handed, Leisure Furl is a great option. However, there was a learning curve and some Leisure Furl owners we met never got past the initial difficulties to achieve the benefits. We tried different setups and techniques over a period of a year prior to embarking on our circumnavigation until we achieved the system which worked for us.
We think the system is great, but like many things, the benefit does not come without some effort. If you have or are contemplating Leisure Furl, you may wish to read on to learn from our experience.
Many of the tips could be useful on other boom-furling systems and for other reefing systems as well.
Equipment
Winch Setup: We have an electric halyard winch and line clutches so the winch can also be used for the furling line. This part of the setup was already installed on the boat but I think it would be extremely difficult to get single-person operation without a power winch. When raising or lowering the main, there must always be tension on the luff—which means controlling the halyard and the furling line simultaneously when working with the sail. Without a power winch, a second person would be required.
Snubbing Winch: To control the tension on the luff when raising or furling, we use a “snubbing winch” which is a small winch used only to control the tension of a line being released. If there is not enough tension when raising the mainsail, it can unroll too fast and the excess sail fabric will keep the luff from feeding properly into the sail track; when furling with inadequate tension, the wrap will not be neat and can damage the sail. When raising the sail, the halyard is on the power winch and the furling line is on the snubbing winch; when furling/reefing, the lines are reversed. Two wraps on the snubbing winch are sufficient to allow us to control the tension. We learned from practice to listen to the power winch to tell us how much tension is on the sail. With our large sail, the tension must be increased somewhat as the sail is raised to adjust for the weight of the sail and track friction which both load the halyard but do not add any tension at the boom.
Hi-Tech Lines:
We changed to hi-tech line (Spectra or Dyneema) for our topping lift. Boom angle is critical when furling. If the boom is too low, the wrap will creep forward on the furling mandrel and the luff of the sail can be forced against the mast and damage the sail and the mast paint. If the boom is too high, the wrap will creep aft on the mandrel and the angle of the sail to the mast track will get too large and this may damage the sail or snap off the bottom of the track (which has happened to us). By trial and error, we established the correct angle starting with Forespar’s recommended 87 degrees. Once we had the boom in the right place, I marked the topping lift (and stitched the mark with whipping twine) so we can get the boom to the needed angle any time. This only really worked after we changed to a hi-tech rope for the topping lift. With our topping lift being over 150’ long, a 1% stretch would yield 1½ feet of travel at the back of the boom and this is too much variation for the furling system to get a smooth wrap. With hi-tech line for the topping lift, we can set the boom position with a mark at the topping lift and get consistently good wraps.
We also use hi-tech line for the halyard and furling line. This helps keep things in place but we had to learn that the line requires more wraps on the winch for the winch to grab. We usually use 5-6 wraps on the halyard winch.
Position Marks: Also, I added marks to our halyard. This way, we can always raise/reef the sail to a repeatable position. I marked the usual fully-raised position along with first, second, and third reef points. Initially, we marked the halyard with “permanent” marker. When these marks began to fade, I added whipping twine marks. These have the added benefit that you can feel them at night as you are raising the sail. We also added a big window to the Bimini so we could see the sail when operating the halyard winch. When we couldn’t see the sail as it was being raised, it was much more difficult to correct little problems.
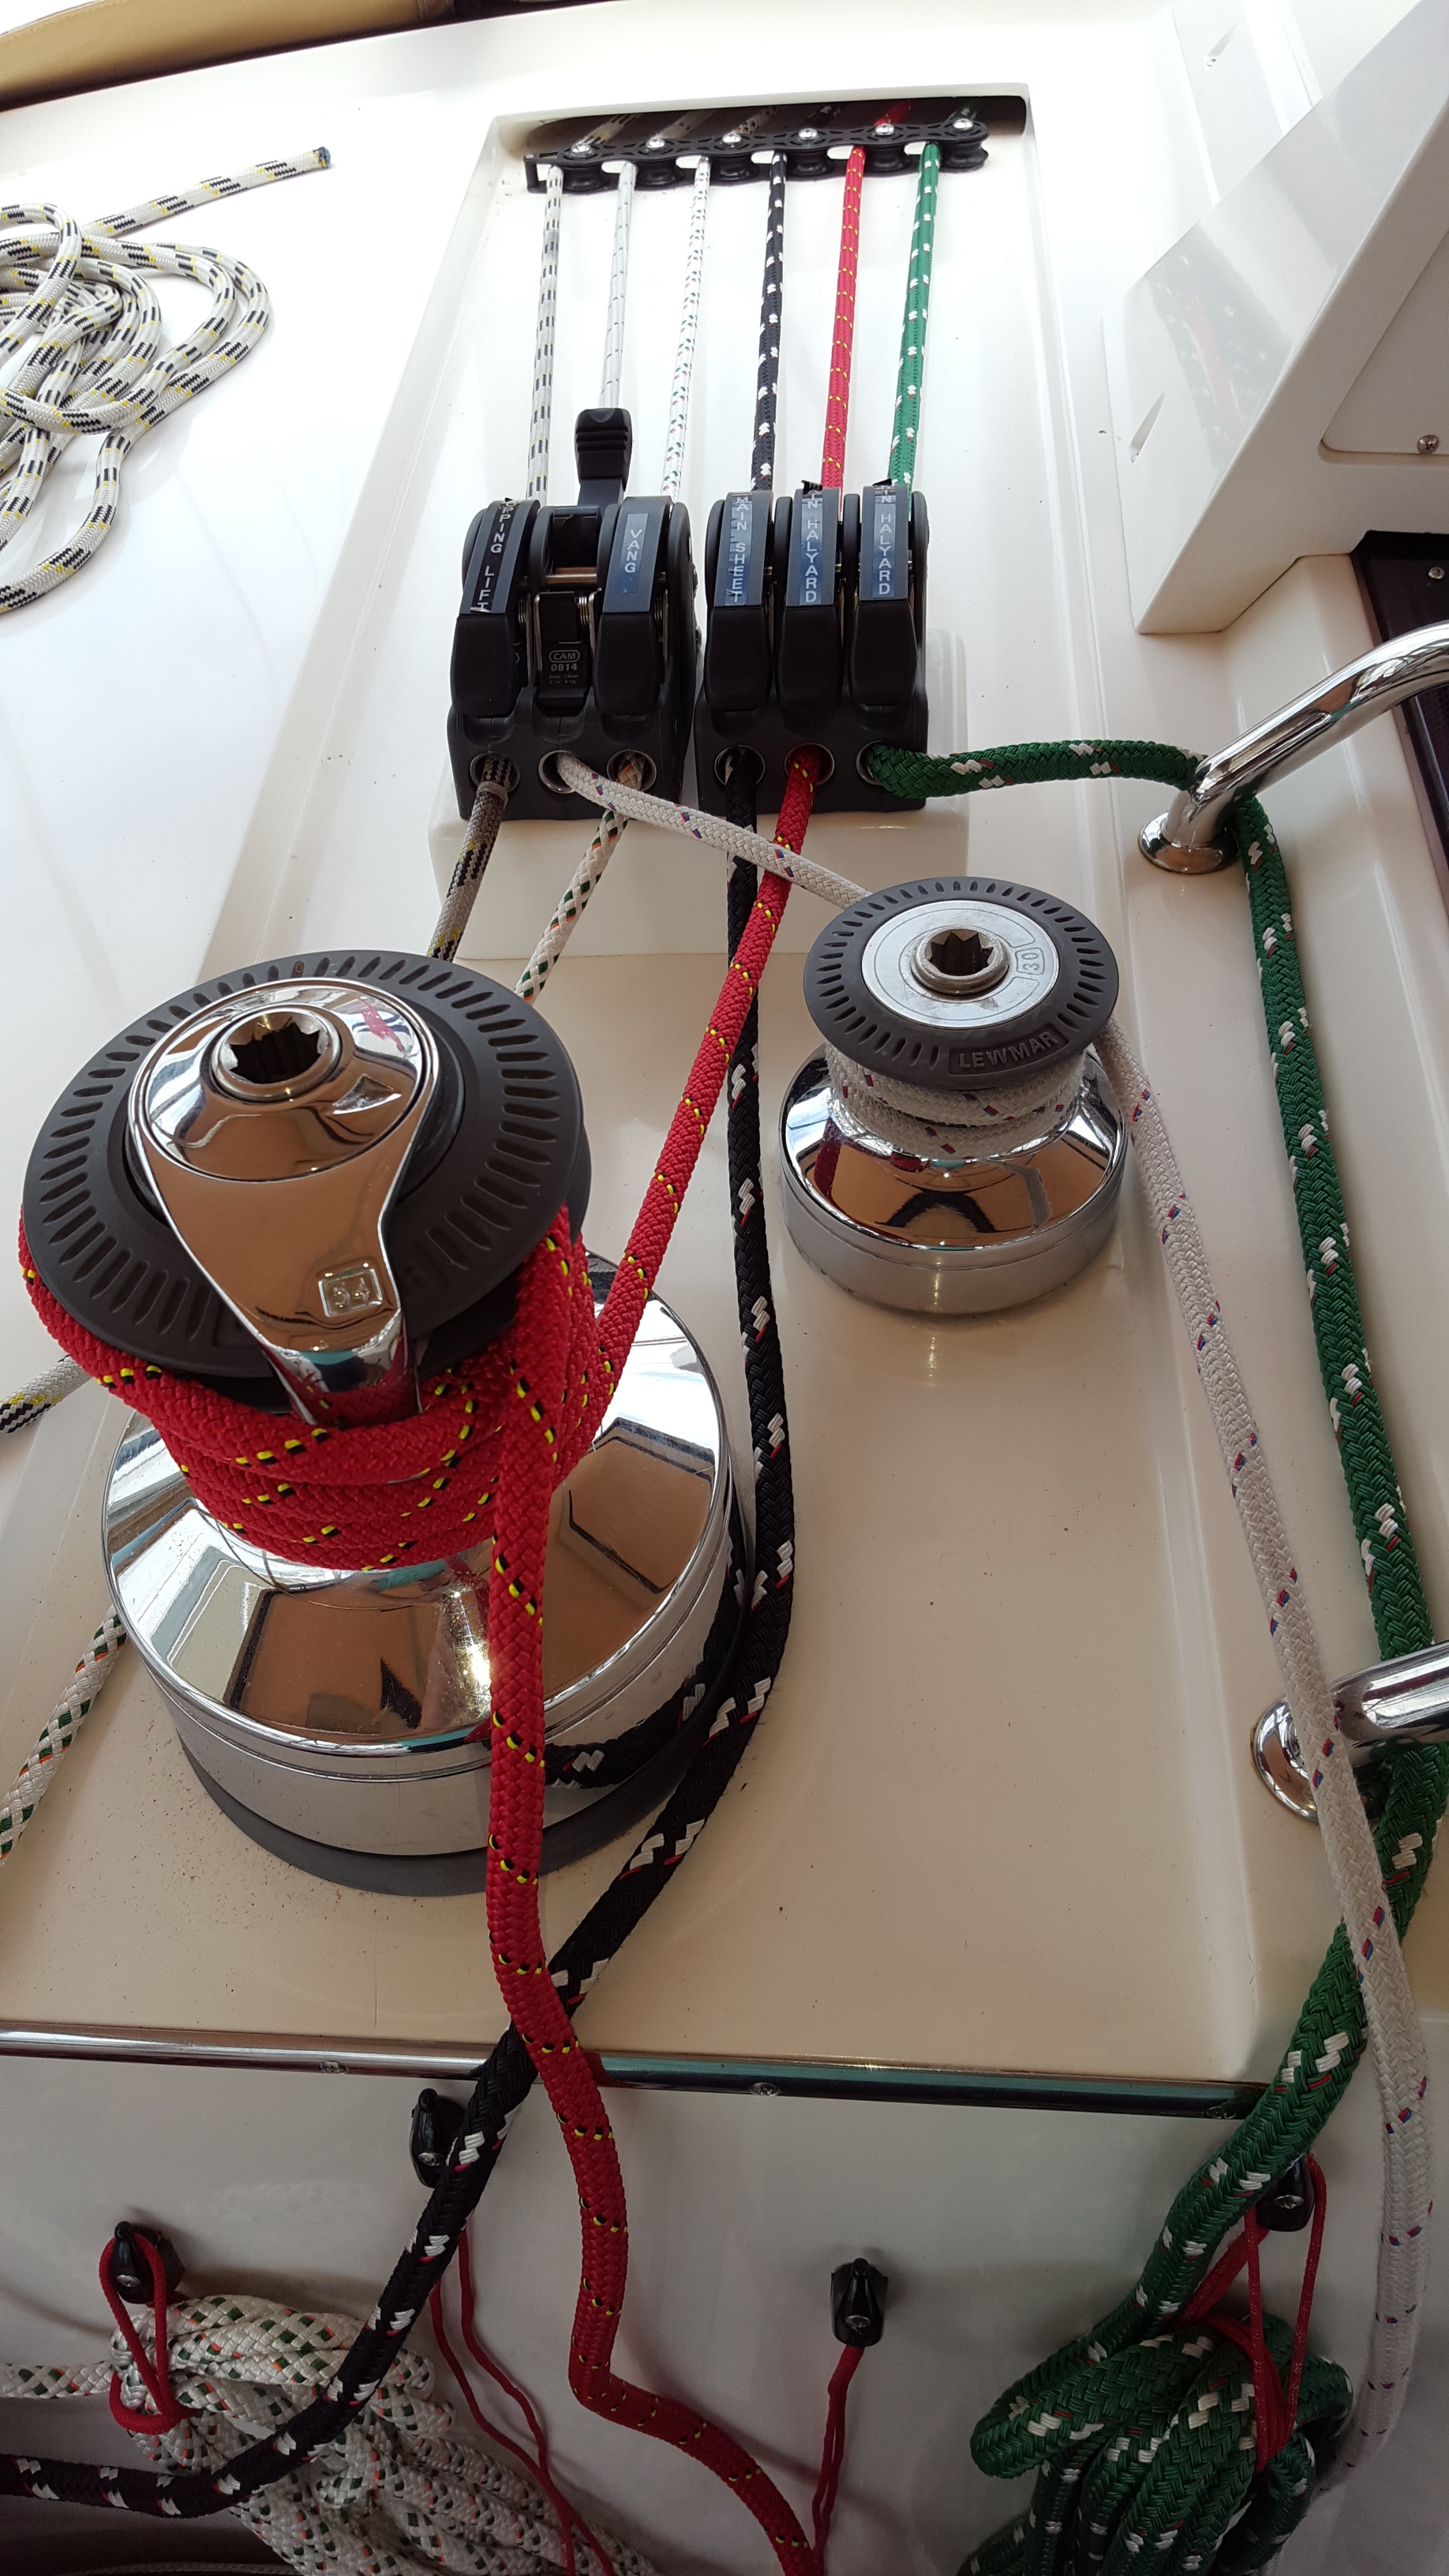
Ready to raise. The boom is in the correct position because the topping lift mark (left-most line) is at the line clutch. The halyard (red) is on the halyard winch with 5 wraps and its line clutch is closed. The furling line is on the “snubbing winch” with two wraps and its line clutch is open.
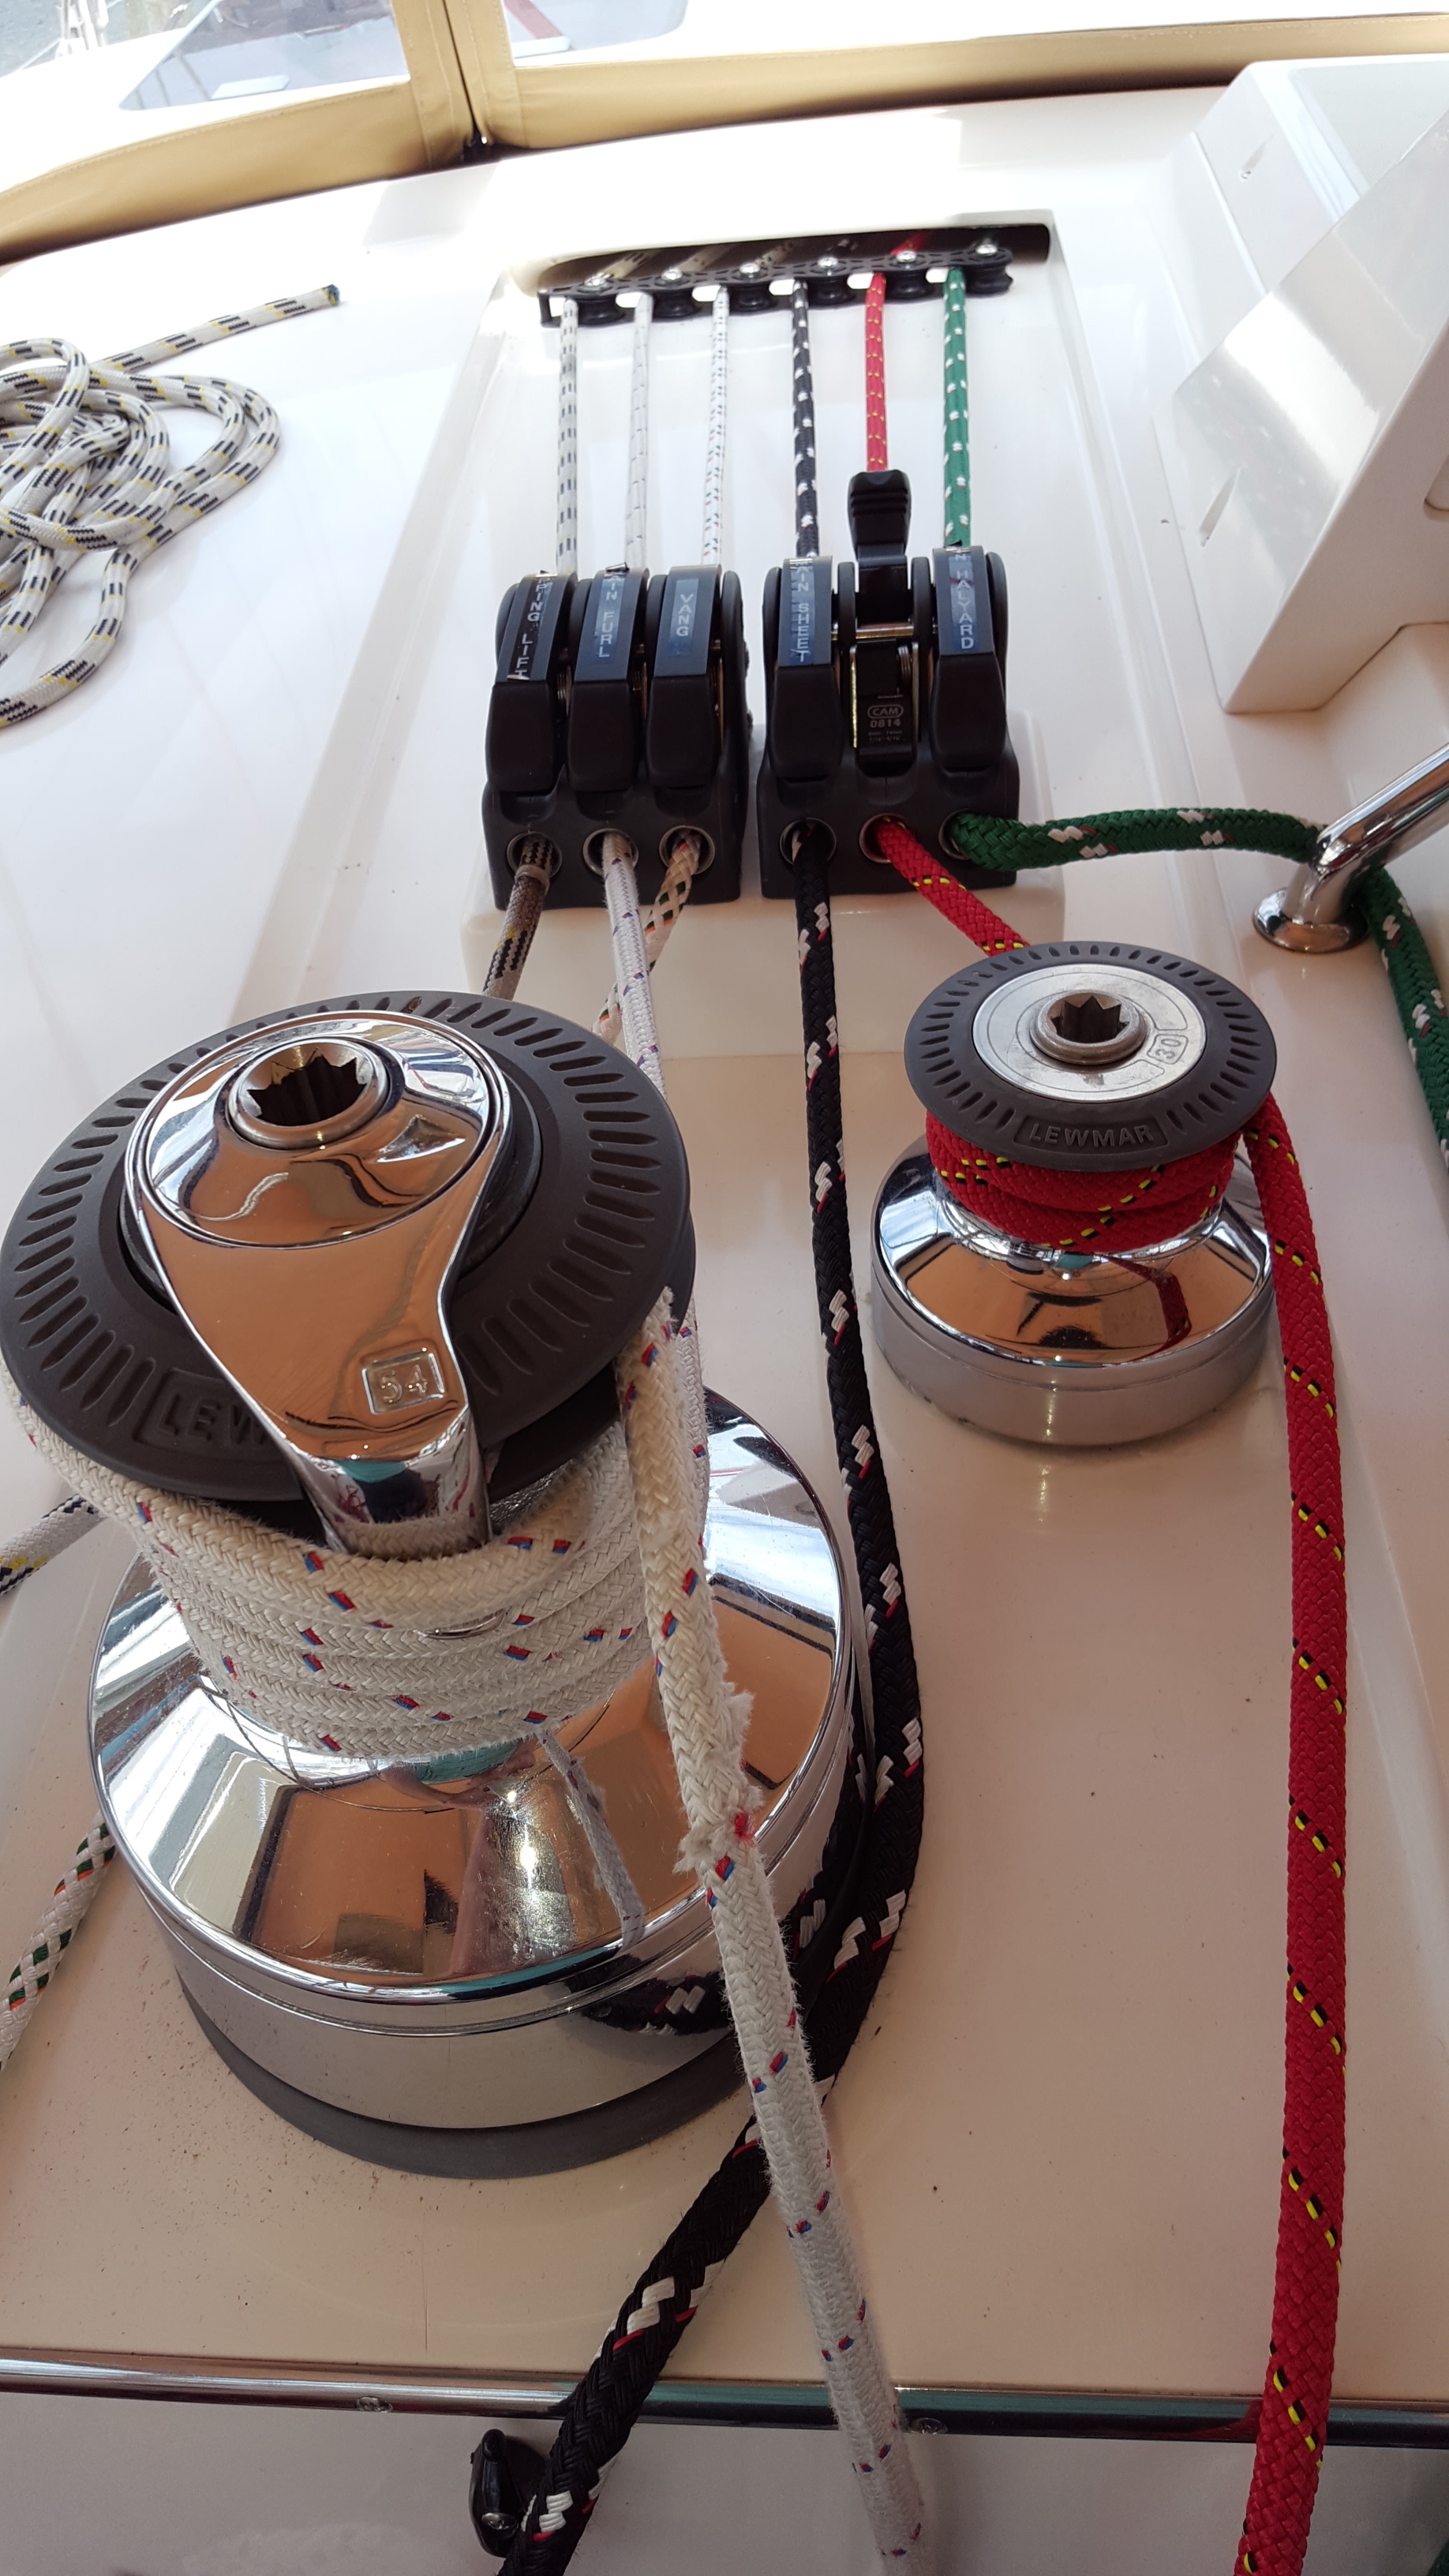
Ready to furl/reef. The topping lift is in the correct position. The furling line is on the halyard winch with 6 wraps, the halyard is on the snubbing winch with two wraps, and its line clutch is open.
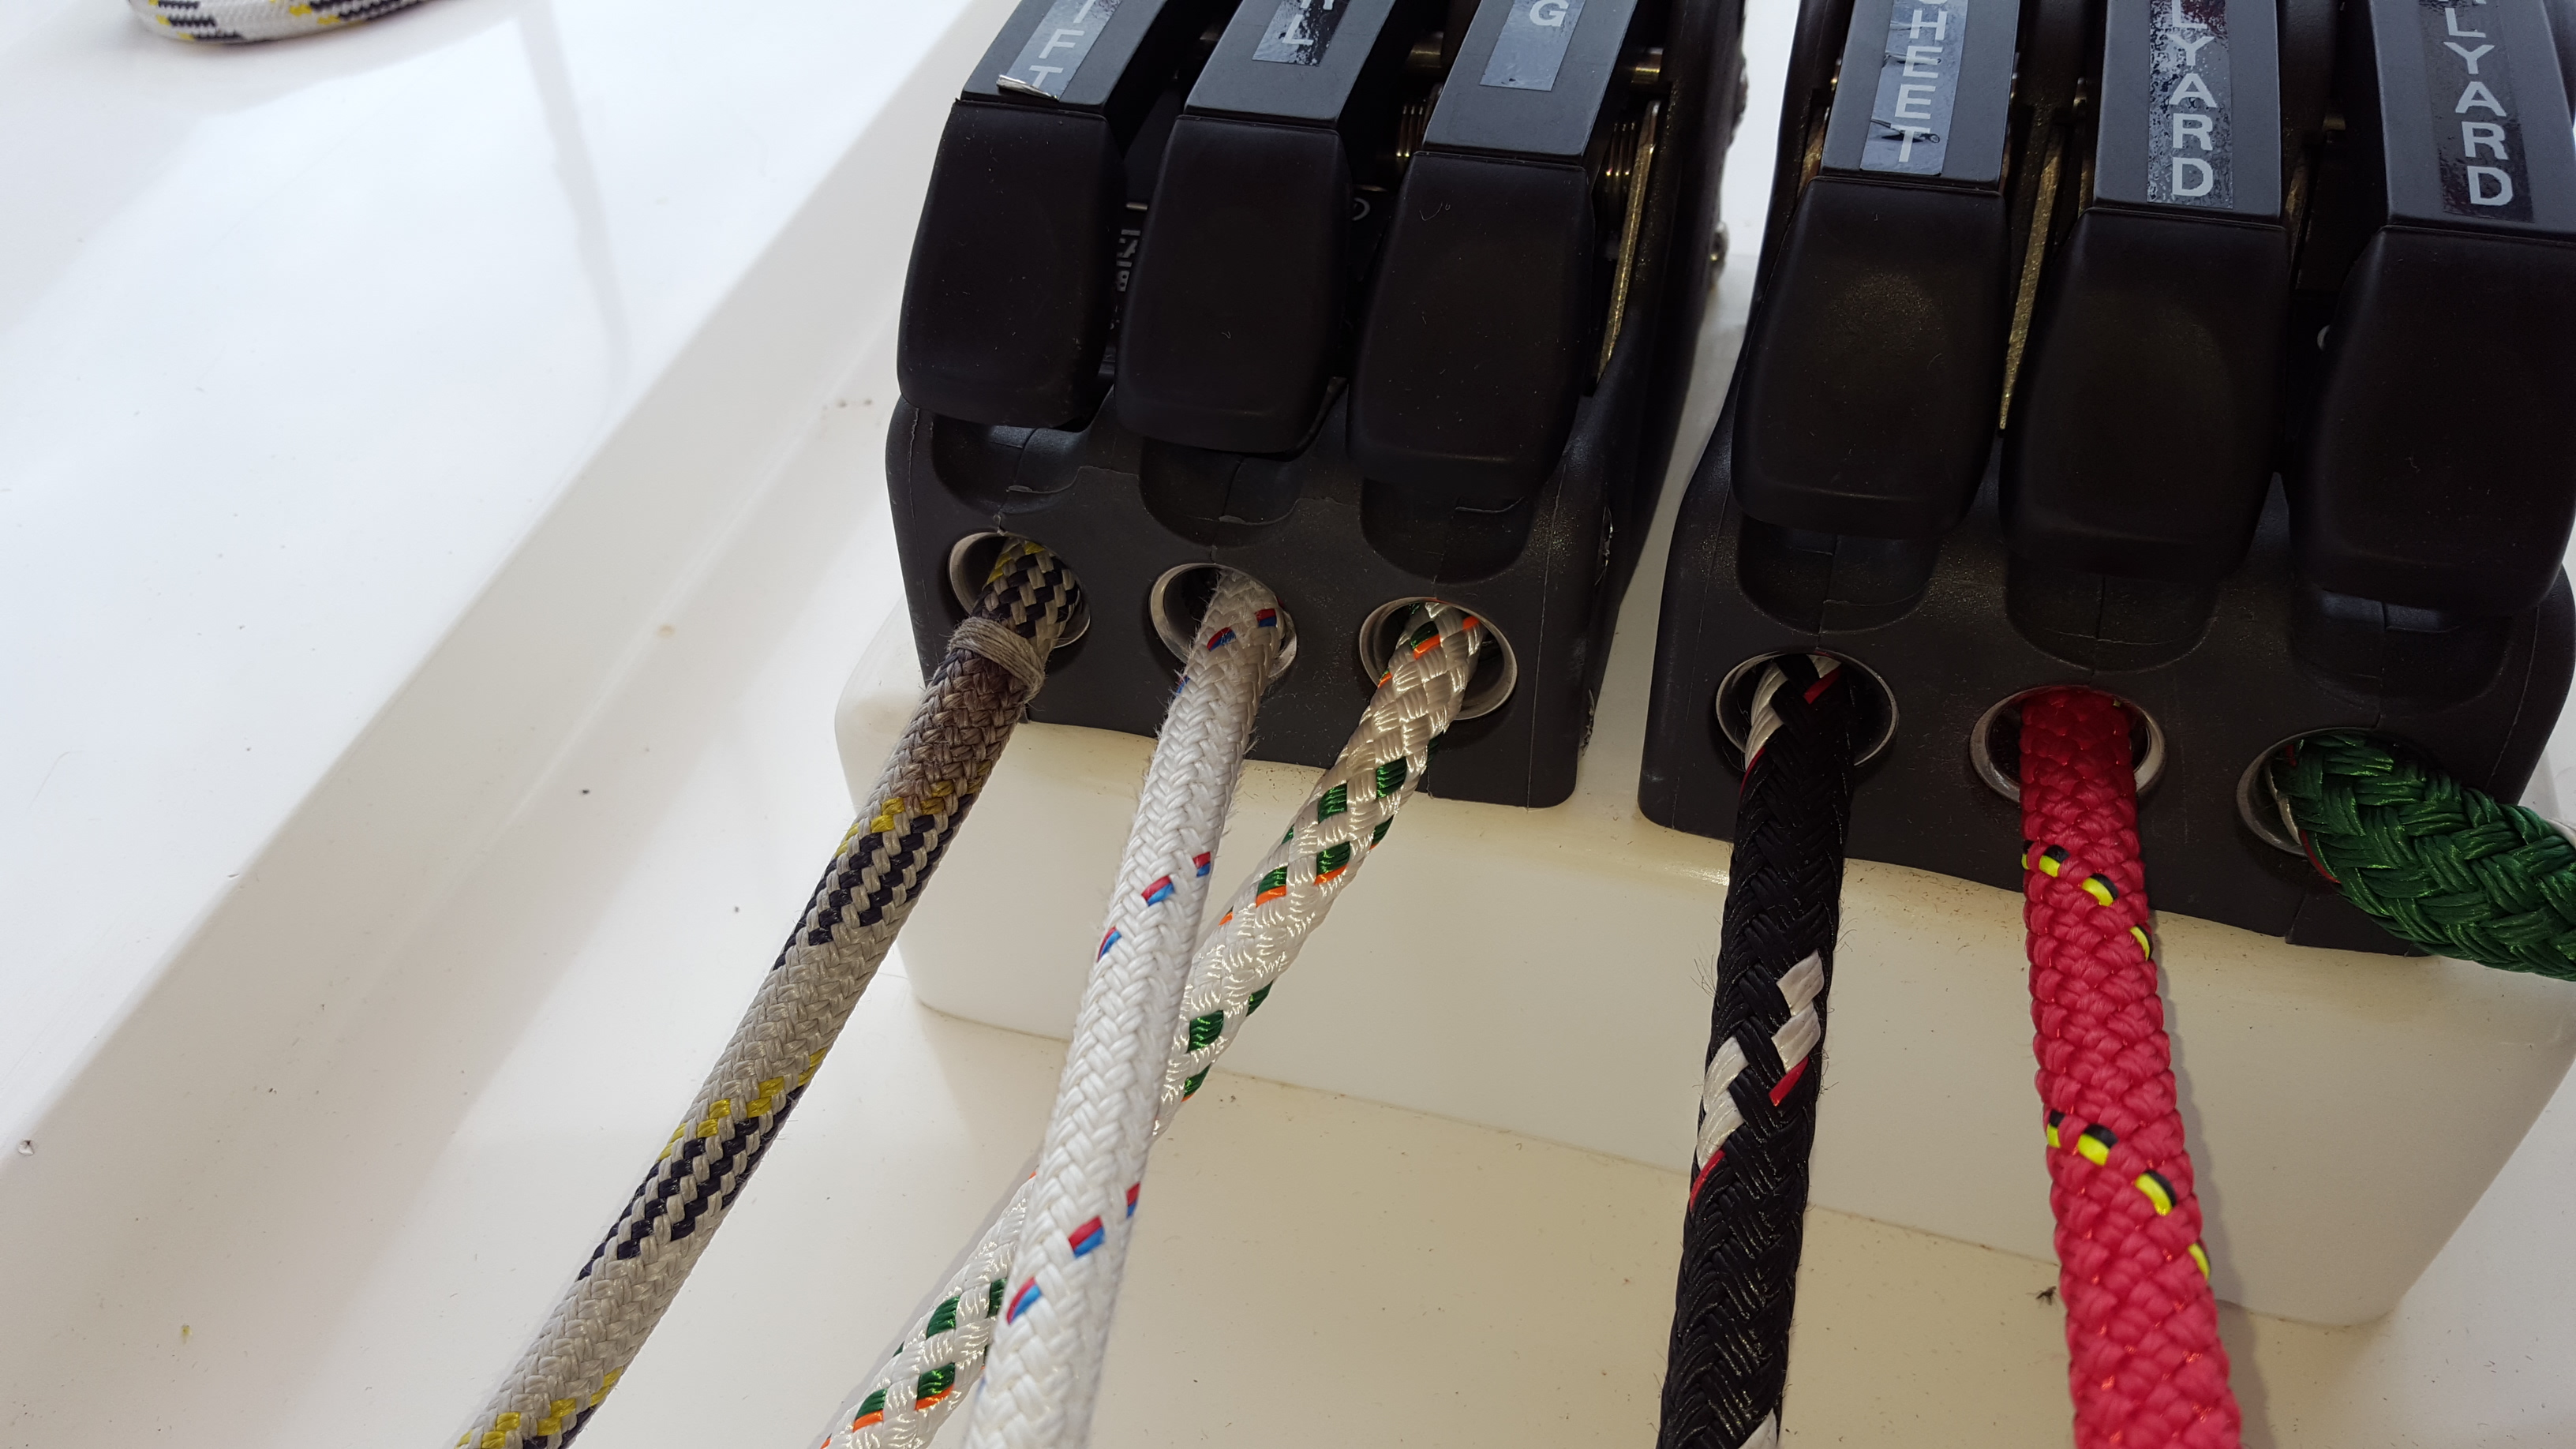
The left-most line is the topping lift with its whipping-twine mark indicating the correct boom position.
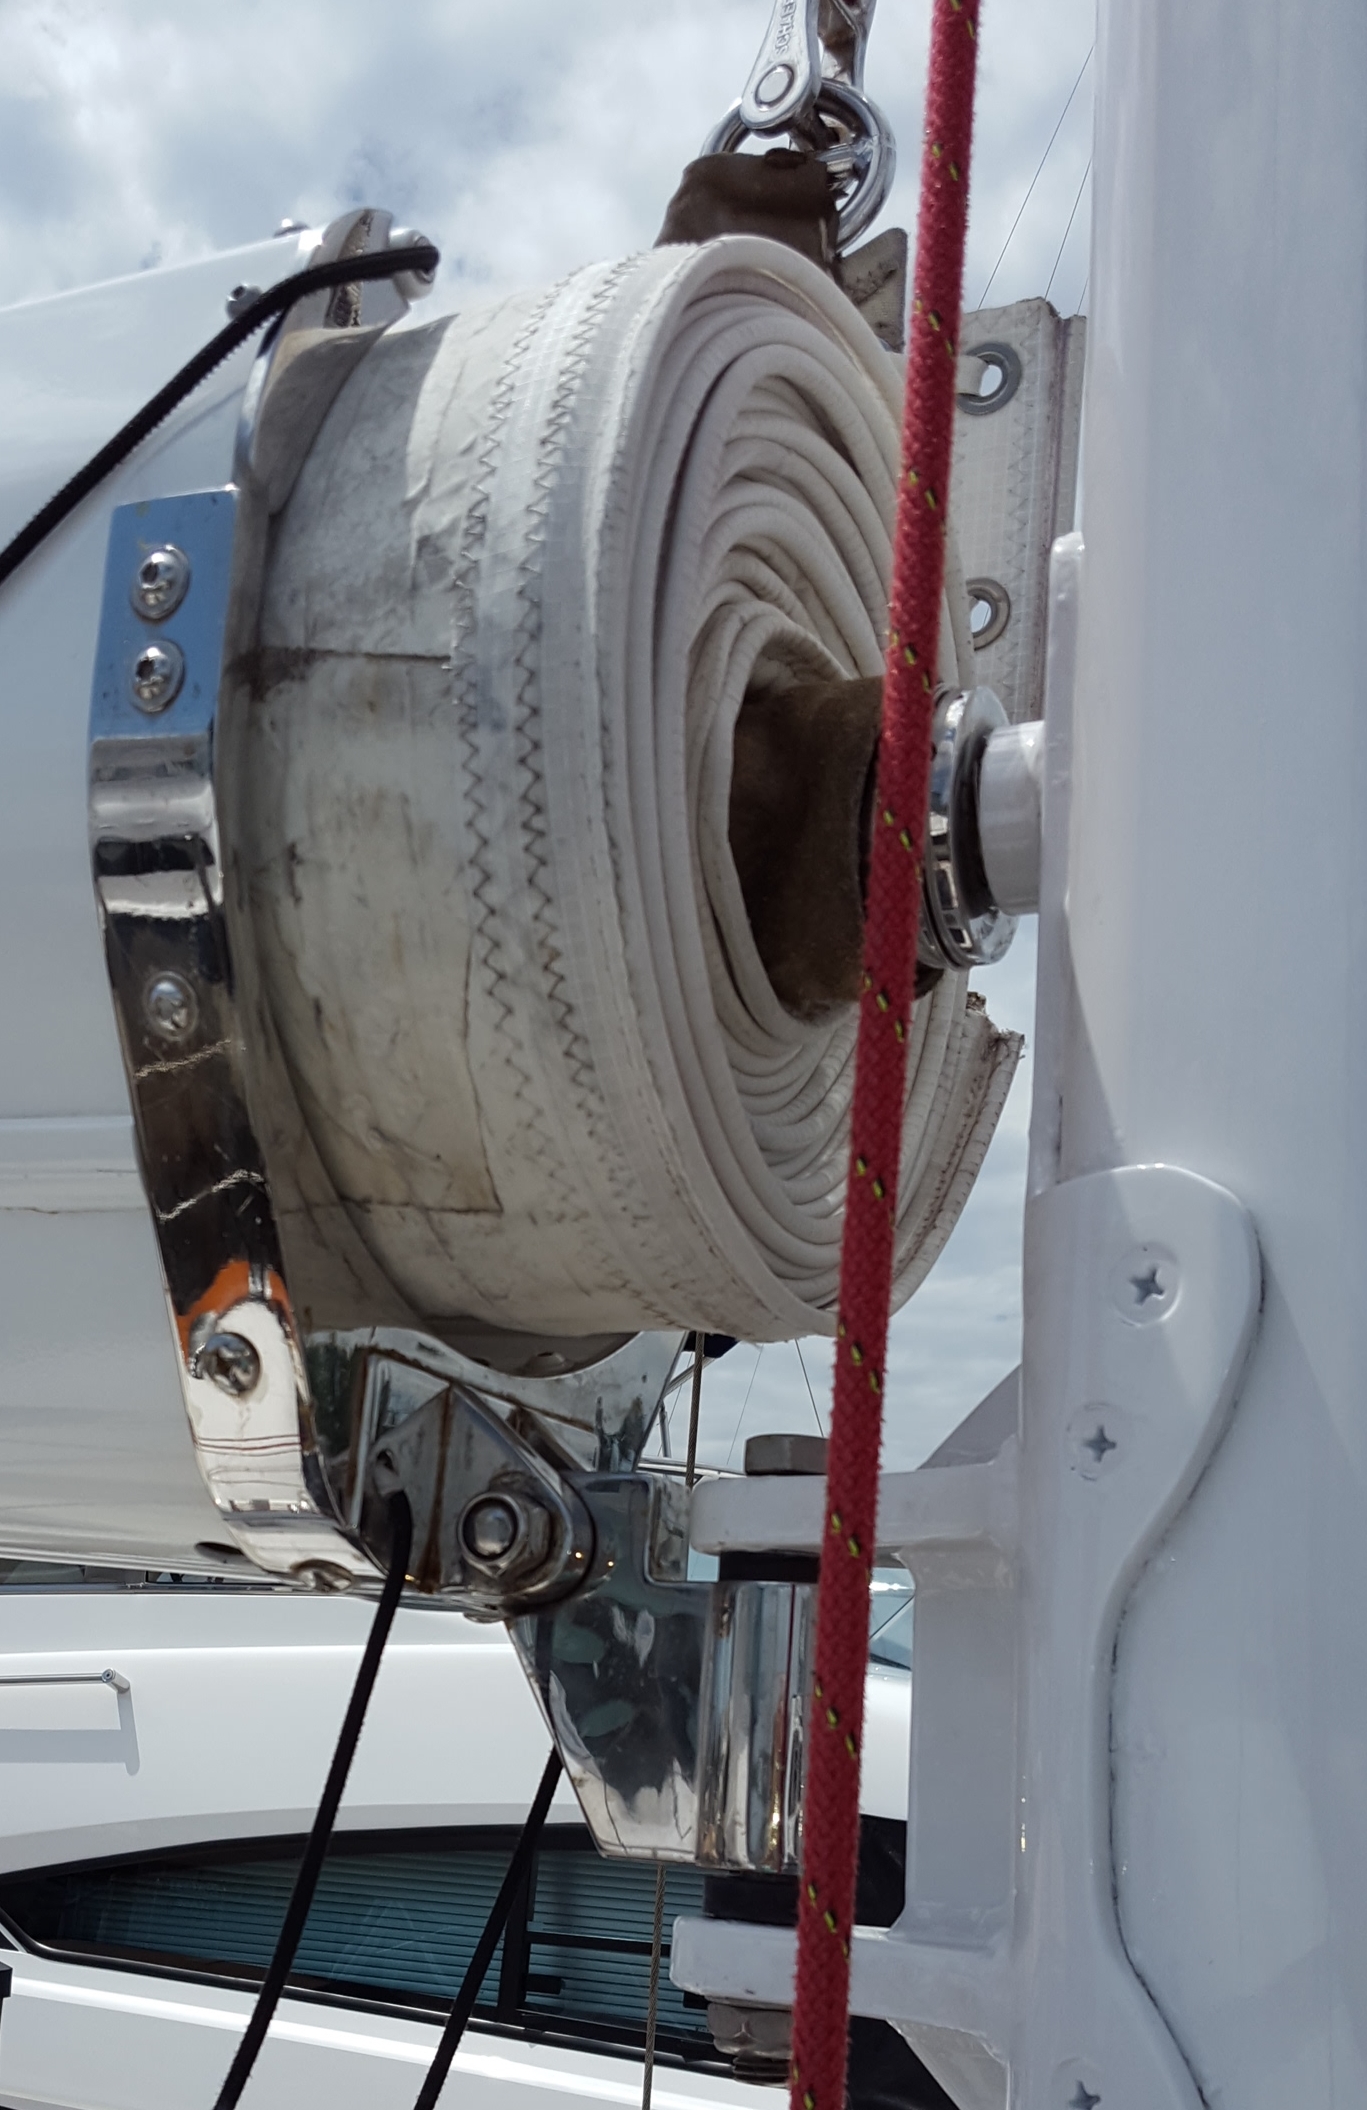
A good wrap—everything is neat and tidy. (Also notice the leather boot on the u-joint which helps keep the lubricant from staining the sail.)
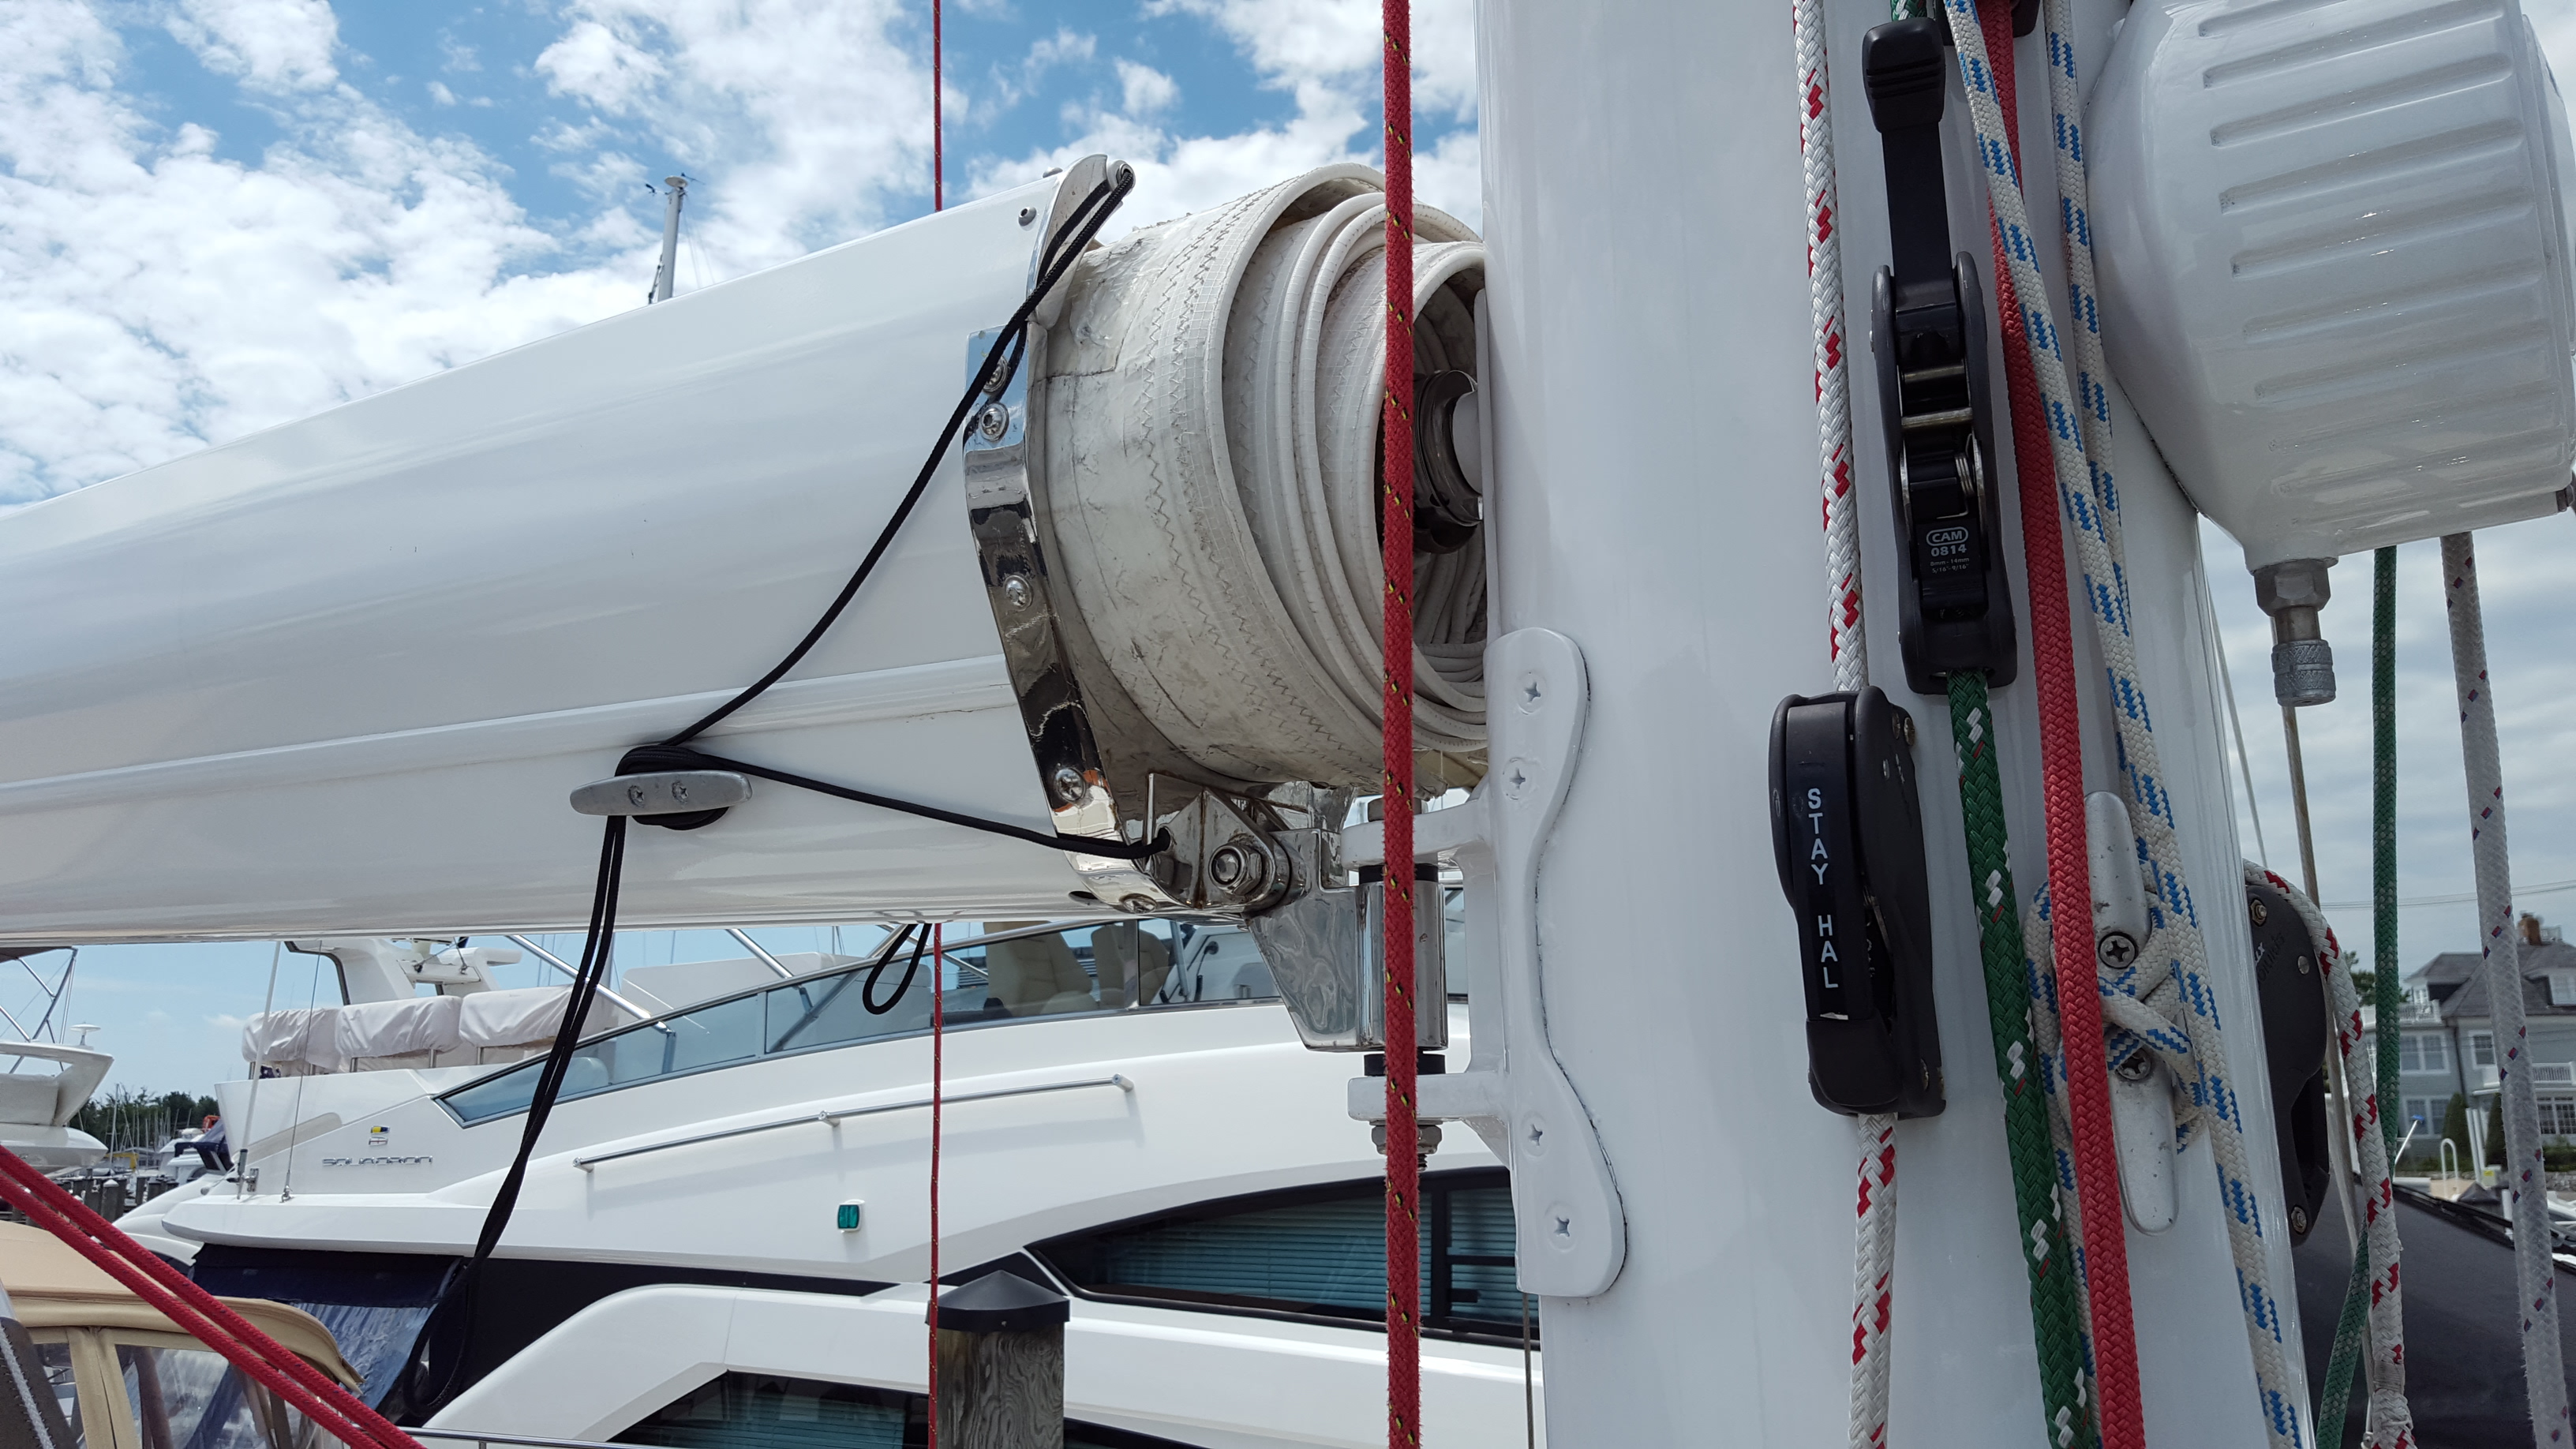
This is a poor wrap caused by a course change to avoid harbor traffic while furling the sail. The forward wrap touches the mast and can damage the luff tape and the mast paint. It also looks unseamanlike.
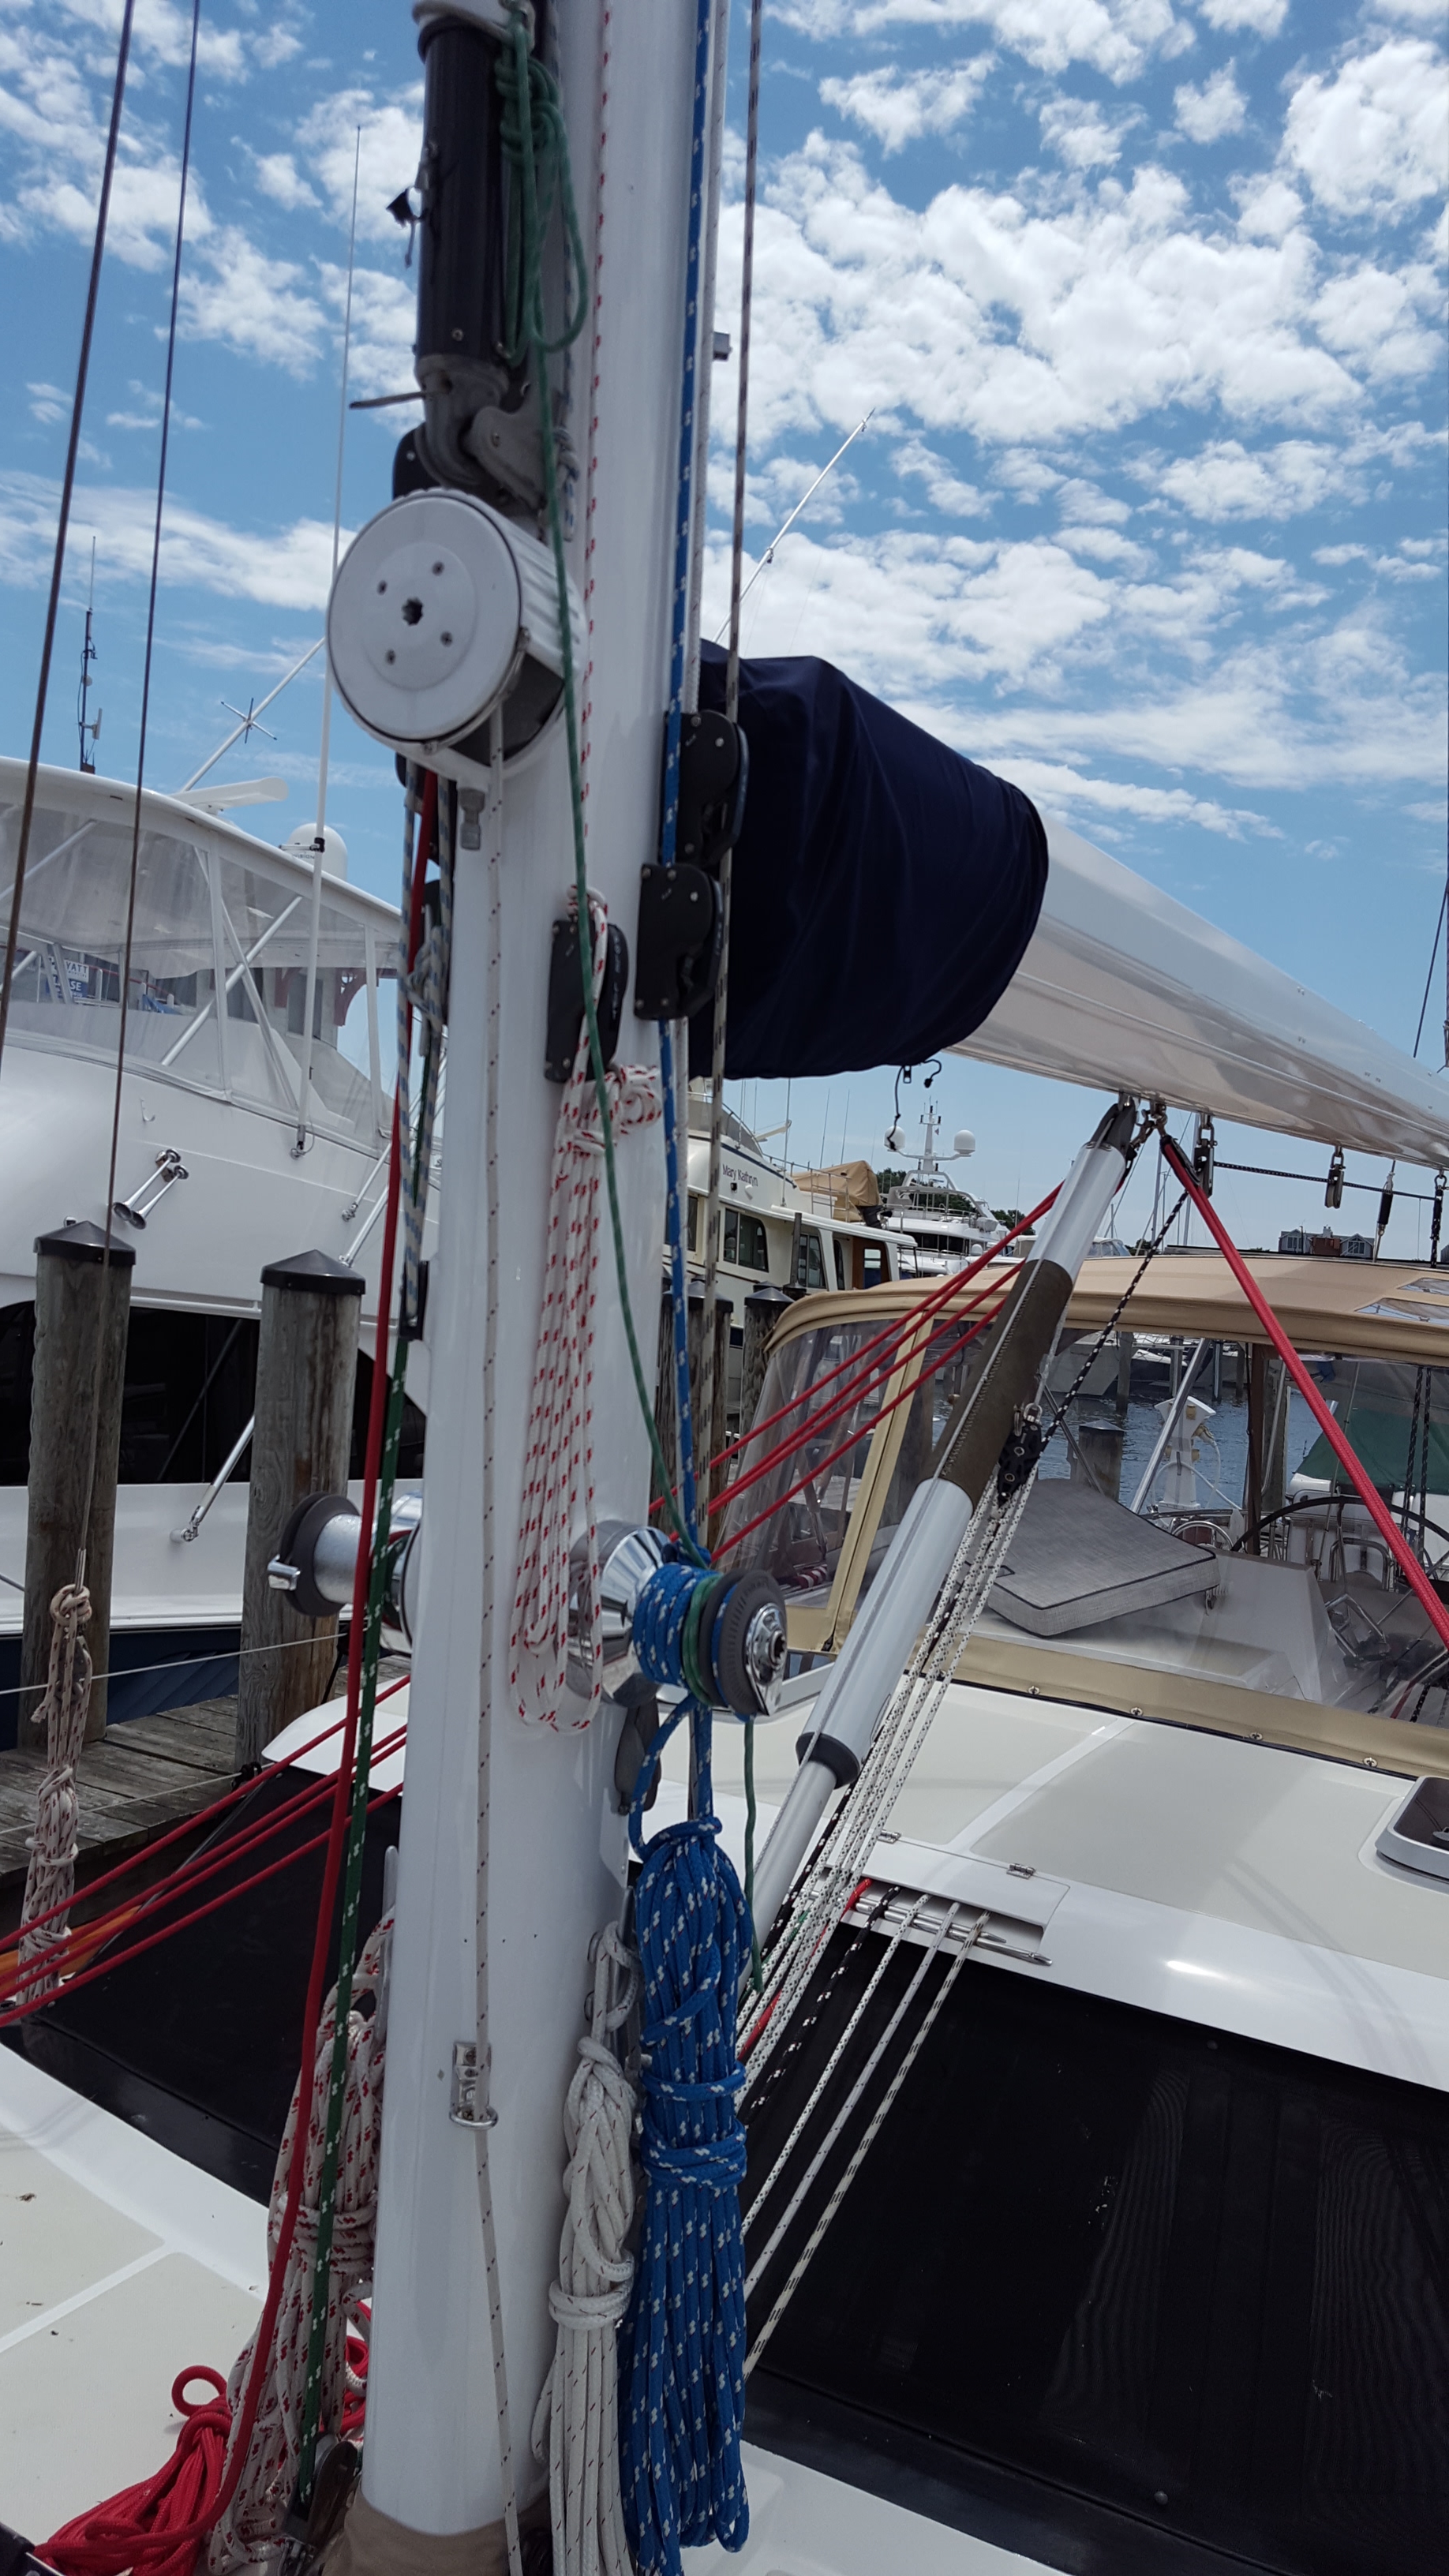
Our preventers are the red lines going up to the boom (behind the vang attachment). They are led aft and can be set without leaving the cockpit. Not only do they prevent accidental jibes but they help keep the boom from working back and forth and reduce the wear on the gooseneck.
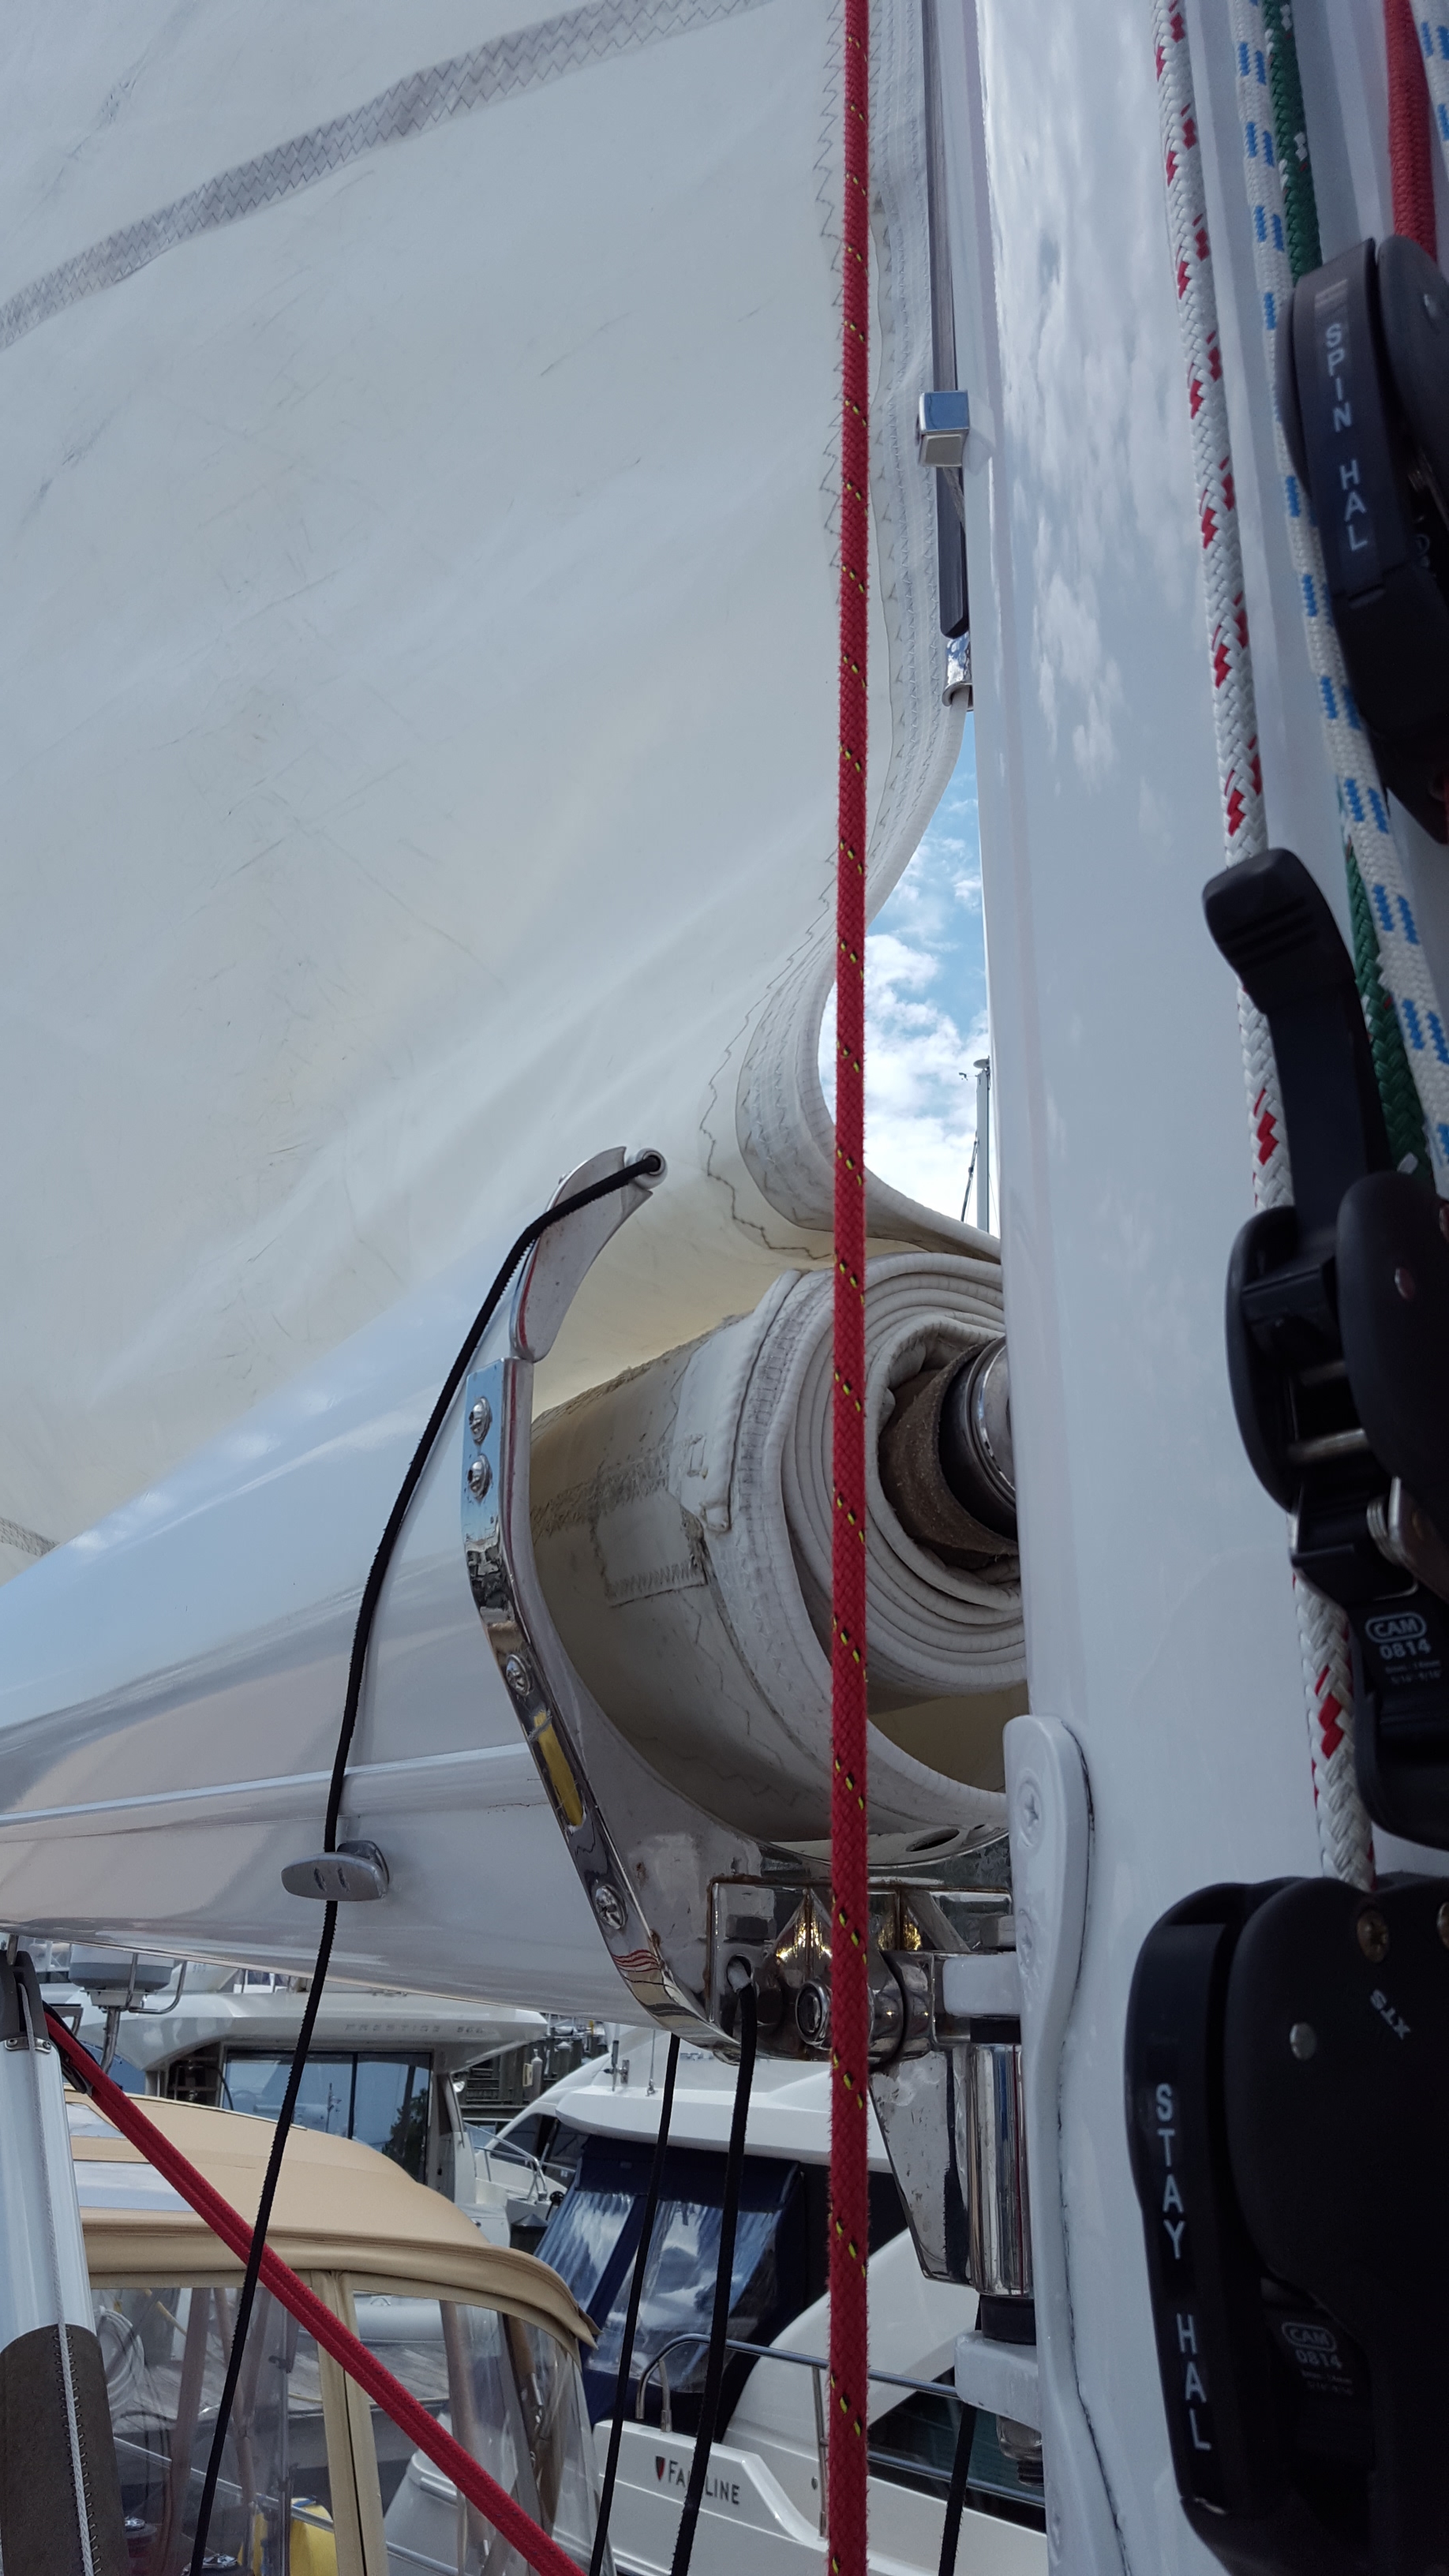
With inadequate luff tension when raising, the sail comes off the furler too fast and does not lead straight into the mast track feeder (the small stainless fitting at the bottom of the mast track). In some wind conditions, this could damage the sail or snap the end of the track.
Techniques
We learned that the mainsail must be fully depowered when raising or lowering. With the sail’s luff-rope in a mast track, any significant power on the sail will cause the rope to bind in the track so much that raising or lowering the sail puts the luff-tape at risk. We can depower by heading directly into the wind but that requires starting the engine.
For reefing/unreefing, if we are sailing on a broad reach, I can oversheet the genoa, then slowly come up into the wind until the genoa causes the main to flog. If we are close-hauled, I sheet out the main until it flogs. Either way, the boat will still be making good speed toward the destination and I can reef without starting the engine and waking up the crew.
We learned to use the furling drum ratchet at the mast when reefed for a significant amount of time. When reefed, the sail is supported by the halyard at the head but only by the reefing line/drum/mandrel at the foot. Even with hi-tech rope for the furling line, the sail works up and down about a half inch as the boat rolls. This is not a problem for short periods but will damage the sail over a period of hours or days. The Leisure Furl system incorporates a ratchet mechanism in the drum so that the drum/mandrel can be locked in place when the sail is reefed. We are careful to make use of this feature on longer voyages.
I discovered that lubricating the furler mast bearings can be easy. When we first got Celebrate, the furler was nearly seized up. I took everything apart to lube the bearings where the furler shaft goes through the mast. Last week I did the same project in about half an hour. I raised the mainsail (not in the track) and lowered it onto the side-deck and then fastened the main halyard around the mandrel to support its weight. Then I could remove the pin from the forward end of the U-Joint and pull out the furling drum. After a cleaning and some grease, everything went back together. Then I could raise the mainsail fully (in the track) and furl it properly. I needed my wife’s help in man-handling the mainsail and of course, this is only possible on a nearly windless day. Previously, I had a leather boot added to the u-joint which keeps the u-joint lubricant from staining the tack of the mainsail.
Tweaks
We had the throat of the sail track feeder enlarged and smoothed. By grinding out the stainless fitting at the end of the sail track, the system became more forgiving of errors in luff tension. As received from the factory, this fitting would tear the luff tape if too little luff tension was applied when raising the sail.
I increased the diameter of the aft third of the mandrel. On Celebrate, as the sail furled, there would be excess fabric at the leach. The result was, when double-reefed, tightening the mainsheet pulled the boom so low that it would scrape the top of the bimini. To solve the problem, I added some lengths of rope along the aft 6-8 feet of the mandrel and attached them with sail tape. That made the effective diameter of the mandrel just enough larger at the aft end to take of the slack in the sail without impacting the majority of the furled sail. I used rope because it is firm enough to increase the diameter of the mandrel but soft enough not to damage the sail.
We lube the sail and track but are prepared to replace the luff tape as a part of regular sail maintenance. We periodically spray SailKote on the mainsail luff to help it slide in its track. Even so, we have replaced the luff tape three times. Keep in mind that our sailing schedule puts years of wear on equipment in a short time. Also, we had extra head slides made when the sail was being serviced. These are considered sacrificial and with spares, I could change them myself as they wore out.
We learned that the furling boom is heavy. When we had the boom removed for repainting in South Africa, I tried to lift it and could barely budge one end at a time. I would estimate that the boom weights over 500 lbs. without the mainsail installed. This weight adds to the strain on the gooseneck and I have had the gooseneck redrilled and rebushed three times as the holes became ovals making the boom sloppy. We added permanently-installed preventers and tighten them down on most points of sail to minimize the boom’s working back and forth which contributes to the wear on the gooseneck.
Summary
These are the lessons learned on the way to getting the best use of our Leisure Furl system. You may choose to use some of these techniques to short-cut your learning curve on Leisure Furl. Taken together, these tips gave us a hassle free system for going around the world.
NOTE: Leisure Furl has not participated in this article and it represents our experience although many of the suggestions are taken directly from the Leisure Furl instructions.